Creating a UI For an AiiDA Workflow
The most common application for designing an AiiDAlab interface is to provide a UI interface for a pre-defined AiiDA workflow that utilises a given piece of scientific software or a collection of software applications to perform a given task. To define the AiiDA workflow (part of the AiiDA application plugin) the developer will have specified the required inputs and outputs pertinent to that workflow, which are often a simplified entry point compared to running the workflow directly through the software package itself. This presents a logical foundation for building the wizard style step-by-step UI’s that are seen throughout AiiDAlab, allowing a user to systematically build up all the required inputs for the workflow in logical steps, then visualise the necessary results.
The example AiiDAlab plugin code provided within this repository contains an example for how to create a UI for a simplified geometry optimisation workflow utilising the ChemShell multi-scale chemical modelling software package, it will provide a basis for the following guides. A more complete and complex expansion on this example, specifically for ChemShell, can be found at aiidalab-chemshell.
Since this is a UI interface which will be heavily based on the specific software workflow being carried out, the following guide may not be appropriate for all design cases. However, it presents a good starting point and a good general structure for computation materials modelling workflows. Details of individual widgets and their implementation is not provided here, see Widgets for more information on specific commonly used widgets and the example plugin for how they can be implemented and used within an AiiDAlab plugin.
Breaking Down Workflows Into Simple Steps
The first step in implementing a AiiDA workflow as an AiiDAlab UI is to break it down into several logical core steps which will define the “wizard” steps in the UI interface. At its simplest this would be workflow inputs -> code/resource setup -> results. For the geometry optimisation example included in this repository, the workflow inputs has been further broken down into initial structure input -> workflow inputs, which enables enhanced interaction and visualisation for the structure input step which is often one of the most crucial in the workflow. These steps are described in more detail below.
Structure Input
This wizard contains several options for setting the input structure for the workflow and has the ability to visualise the chemical structure that the user inputs. Separating out this step from the remaining workflow inputs enables the improved visualisation however, it also provides a re-usable framework since the structure input is most likely common across all defined workflows. This wizard must expose the structure in its model component which will retain this input as the user moves through the remaining wizards.

Code example: structure.py
Workflow Input
This wizard step contains input fields for the various exposed input for the simplified workflow, this will all correspond to input fields from the workflow itself. Each input field within the wizard generally will link to a variable within the workflow steps MVC model component which will store the users inputs as they move through the remaining inputs.
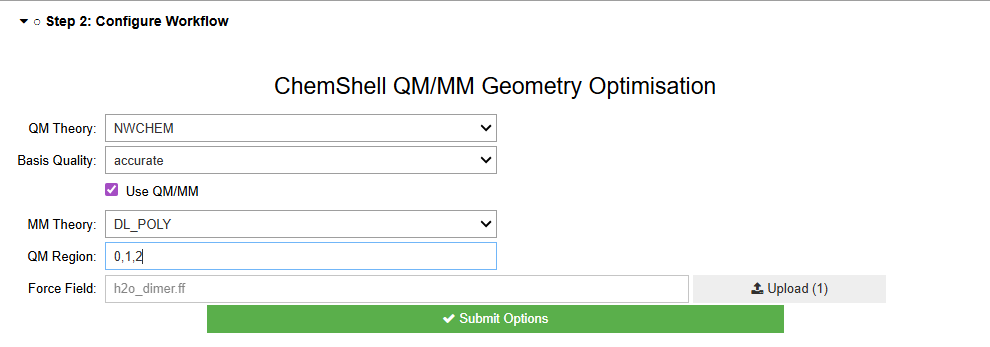
Code example: workflow.py
Code Setup
This wizard exposes fields which allow the user to configure which AiiDA code instance the workflow will use to carry out the jobs, this includes fields to specify computational resources to provide to the code instance such as memory and MPI processes (for parallel codes). These can often be set to sensible defaults so the user doesn’t need to understand how they work internally. Finally this wizard also exposes input fields to provide a label and description which will be applied to the submitted AiiDA process node. As this is the final input based step once the submit button is pressed the model side of the app will collate the input variables provided and submit the process.
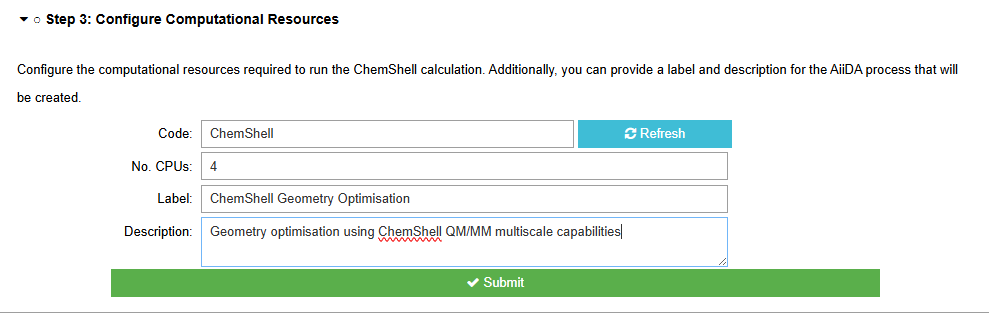
Code example: resources.py
Results
The final wizard is disabled until a process has been submitted. Once a process has been submitted it used the process uuid to determine the process state and its generated outputs, which can then be visualised within the wizard’s view.
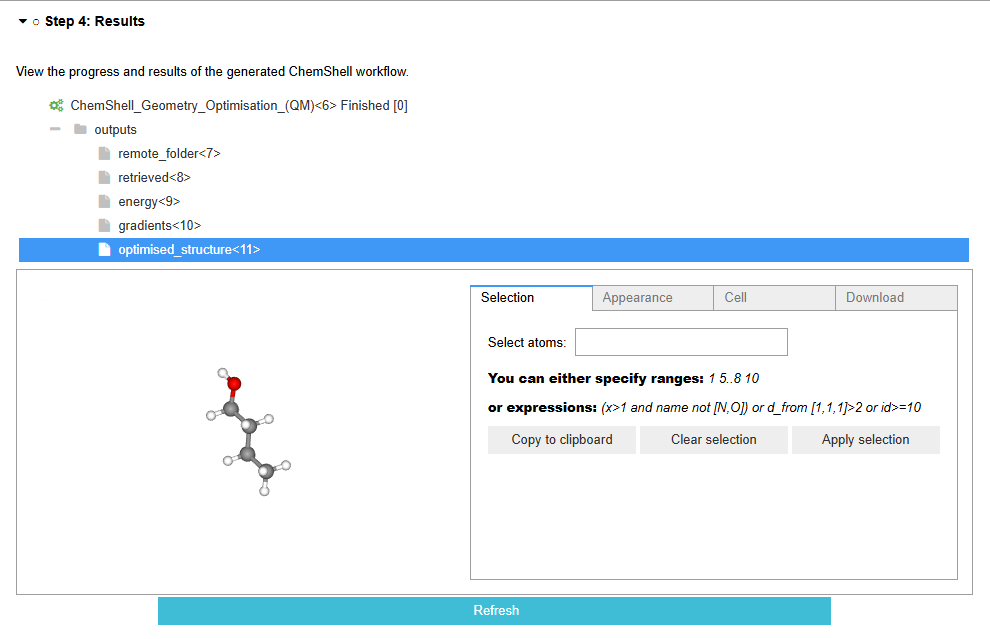
Code example: results.py
Process Configuration and Submission
Throughout the design of the UI each visual component (view) corresponds to a model component which stores the state of the variables which will define the inputs to the AiiDA workflow. These must remain independent from any visual components and are references by their corresponding view component using functions like link, dlink and observe from the traitlets and ipywidgets modules to link the data values to dynamic UI components. A global application model class defines all the individual model components and provides the glue that links them together once the process is ready for submission.
There are two methods for submitting the AiiDA process using the collated inputs. The first is
shown in process.py
which uses the AiiDA builder object for the CalcJob/WorkChain process to assign the required inputs
and then uses the submit function to submit the process and return a reference to the generated
process noe. The other is to simply generate a python dictionary containing all the results and
pass this directly to the submit function in the form submit(CustomWorkChain, **input_dictionary).
Exposing Multiple Workflows
Once a single workflow has been exposed as a UI interface within an AiiDAlab app, it is often then very straightforward to extend the UI to expose multiple additional workflows. This draws from the fact that many of the steps are identical across workflows, such as all workflows may require an initial structure and the same code/resource setup steps therefore the only aspect that needs updating is enabling the workflow step to provide UI input components for the new workflow’s inputs. This can be achieved by simple defining different views for the core input interaction components which then can be dynamically loaded into the workflow wizards main view. This should often be a key consideration when breaking down the workflow into its constituent steps to improve maintainability and adaptability when building upon the existing application.
Examples of how this could be implemented can be seen in aiidalab-chemshell or aiidalab-qe.
Working With WorkGraphs
AiiDA provides an alternative method for connecting together individual AiiDA jobs in the form of WorkGraphs which additionally provides an alternative UI for creating complex workflows with AiiDA. This option is particularly aimed at creating custom multi-step workflows which are not directly exposed within the underlying AiiDA plugins, with additional convenience of being able to easily link together different AiiDA plugins for different steps of the workflow. They provide both python scripting and UI based editing tools for linking together different AiiDA processes tracking how outputs from one process can be directly used as inputs for others, with additional support for complex conditional logic. The UI presents a convenient flow-chart style visualisation and management of these complex workflows whilst python scripts can enable advanced and increasingly complex workflow structure and features.
Detailed documentation for how to create and use AiiDA WorkGraphs and their associated tools is beyond the scope of this document however, detailed guides on how to use WorkGraphs can be found here.
WorkGraphs can be integrated with AiiDAlab in a similar fashion as WorkChains, either via direct conversion
to a WorkChain, or via direct submission through the AiiDAlab plugin using the WorkGraphEngine from the
aiida_workgraph python package. See the
AiiDA WorkGraph documentation
for more details on the interoperability of WorkGraphs and WorkChains.
Additionally, since they both run on the same core concepts, i.e. the underlying AiiDA engine, a user can create WorkChains interactively outside the AiiDAlab plugin and still include and visualise the processes and outputs within the AiiDAlab UI.